Modern breeds and crosses of traditional chickens and broilers can achieve impressive indicators of growth, egg production, weight gain rate. At the same time, seemingly insignificant factors often become decisive, one of which is good ventilation in the chicken coop. We will discuss further what ventilation is and how to provide it.
Why do you need ventilation in the chicken coop?
The equipment of the chicken coop ventilation system is necessary for the following purposes:
- Thanks to ventilation, clean air circulates in the house and dust is removed.
- Litter is a source of ammonia harmful to birds, which is removed due to the air exchange system.
- The air temperature is adjusted, especially in hot weather.
- Allows you to control the level of humidity. This indicator is extremely important (it is unacceptable for birds to be too humid air or excessively dry). In winter, litter, droppings and drinking bowls are a source of increased evaporation of moisture, in addition, increased humidity, as well as residues of feed and droppings, are a breeding ground for various infectious diseases. In addition, moderate humidity eliminates the formation of mold (fungus), which adversely affects the body of the bird.
 If the house is not equipped with an air exchange system, the risk of developing infectious diseases, as well as respiratory diseases in winter, is increased. In summer, birds suffer from heat (can lead to heat stroke) and dry dust.
Main requirements
The basic requirements for artificial ventilation are as follows:
It will be useful for you to find out
- Clean air should be enough for the whole population. The correct calculation of the volume of necessary fresh air in the chicken coop can be done according to the following formula: 7 m³ / 1 kg of live weight in the summer and 3-4 m³ in the winter. In this case, the air flow in the warm season should not exceed 0.85 m / s, and 0.5 m / s during the onset of cold weather, otherwise there is a risk of drafts.
- The duct must be adjustable so that the birds do not freeze in the winter.
- Duct valves should have the function of completely stopping the air supply, this is necessary in case of severe frost.
- Ducts must be positioned so as not to cause drafts that are hazardous to bird health.
- It is advisable to install grilles with holes of small diameter on the duct, with a correctly mounted system, their diameter will be enough for normal ventilation, while maintaining heat.
Ventilation and warming, and, if necessary, additional heating, should provide 60–75% air humidity in the house and a temperature of +5 ... + 23 ° С.
How to make ventilation in the chicken house with your own hands?
There are three types of ventilation:
- supply and exhaust;
- forced (mechanical);
- natural.
Did you know? In 2012, in Sri Lanka, a chicken gave birth to a chicken through live births. The chick turned out to be quite healthy, while the chicken died from the injuries.
Supply and exhaust
Simple to implement and at the same time effective system for a small private household. Airing is carried out due to the pressure difference in the supply and exhaust pipes located at different levels.

At least two pipes are used - the supply pipe (located below, its outlet, the lower section, is located below, near the floor) and the exhaust pipe (which section is located under the ceiling, and above the roof its upper section is above the supply pipe).
The diagram clearly shows the principle of operation and the location of the pipes. To make such a system yourself is simple.  Supply and exhaust ventilation scheme
For this you will need:
Tools:
- drill with drill or drill bit;
- Reciprocating saw (if any);
- welding machine (if the pipe is metal);
- building tape;
- level.
Materials:
- plastic pipe (metal can be used) Ø 10 cm - 3 m;
- mineral wool;
- sealant (water glass);
- roofing material;
- wire;
- mounting glue.
Important! In specialized stores, plastic pipes are on sale, complete with a damper.
Progress of work:
- Measure the height of the ceilings in the chicken coop. This distance + 10 cm is the height of the supply pipe. Using a hacksaw, saw off a piece of the appropriate length (it will be located vertically so that its lower cut will be 20 cm above the floor and the top cut 30 cm above the roof).
- The length of the exhaust pipe is calculated so that both of its sections are located 25-30 cm above and below the roof.
- Using a drill and drill (saw bit) or reciprocating saw, make holes in the roof of the appropriate diameter.
- Now you need to make a “roof” on the upper cut of both pipes, it is necessary to prevent water from entering the system. If you use a metal pipe for ventilation, you can weld a piece of the same pipe, cut in a diametrical plane, 15–20 cm long (looks like a roof with a semicircular profile), or a piece of a building corner that is horizontally welded to the upper cut. For plastic pipes use the same semicircular "roof" and mounting glue.
- Insert the pipes into the corresponding holes at such distances as described above. If you use plastic pipes, they will hold without additional devices, as they are light weight. It is necessary to weld a transverse corner to metal pipes, which will be on the upper slope of the roof, preventing the pipe from moving down.
- Using mineral wool and sealant, cover the cracks remaining around the pipe, then coat these places with resin. However, cotton should be placed on the pipe outside (insulation will not allow condensation to collect inside), and the cotton itself should be wrapped with roofing material, which should be fixed with wire.
- Cut out of any material at hand (preferably plastic or laminated plywood) latches of such a width that they tightly close the upper section of pipes, abutting against the edges of the inner sides of the "roof". The width should be calculated so that the valves are firmly fixed between the sidewalls, and at the same time move easily, increasing or decreasing the opening of the air intake. The valve length is 15–20 cm.
Video: How to make supply and exhaust ventilation
Forced
This ventilation system does not justify itself in small (up to 80–100 individuals) private farms, since it requires electricity consumption.
The essence of the method: with the help of an electric fan, a fan is installed in the window (if it is not there, the fan is installed in the wall), which pumps air.Important! In the simplest version of mechanical ventilation, the fan works to pump air into the house!
You can optionally equip the house with humidity and temperature sensors that will turn the fan on and off.
It is not difficult to make mechanical ventilation, for its equipment you will need:
Tools:
- jigsaw (reciprocating saw or drill);
- screwdriver.
Materials:
- a fan with an electric wire of the required length;
- piece of plywood or osb-plate 5 mm;
- self-tapping screws.
Work execution order:
- If the fan is installed in a window, glass is removed from it, if there is no window, a hole is made in the wall of the chicken coop, using a jigsaw, reciprocating saw or drill (perforator). Its dimensions should be 2-3 cm greater than the length and width of the fan (if the fan is round, respectively, the diameter of the hole should be larger by the same amount). The hole is best done above the perch level, closer to the ceiling.
- Using screws, plywood or an osb-plate, a fan is installed in the hole. Wiring and a switch (it can be combined with a light switch) are done outside the house.
- In more complex devices, in addition to the mechanical switch, the fan can be equipped with circuit breakers from humidity and temperature sensors located in the house.

Natural design
Natural ventilation is nothing more than an open window and a door between which natural air draft is created.
Did you know? Hens are genetically most like their ancestors - flying dinosaurs. At the same time, the closest relatives of all birds, of the animals existing today, are crocodiles.
There are two types of such ventilation:
- Unregulated (infiltration) - air is supplied through an ajar door or window.
- Adjustable (aeration) - in this case, a window is located above the perched bird, preferably a sliding window (it is easier to achieve the required volume of air flow). An open door gives an influx of fresh air, and through an open window to the desired size the exhaust will go off, along with ammonia.
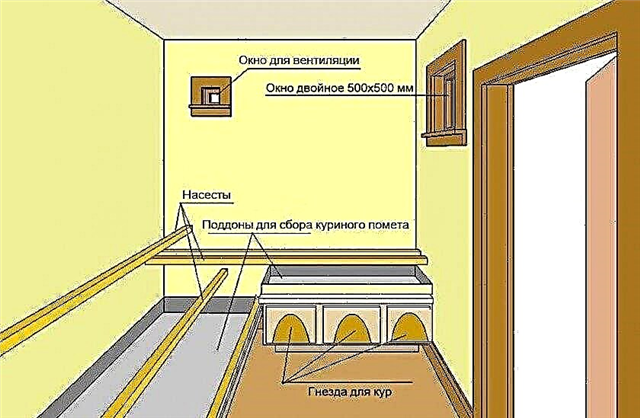 Scheme of regulated natural ventilation
Both methods are only good for the warmer months, as additional heating is required in winter, and there is a risk that the bird may catch a cold.
Features hoods in the winter
In winter, the most practical type of ventilation for a home coop with a small population is supply and exhaust. The disadvantages of natural ventilation, especially in winter, were mentioned above.
As for the mechanical system, it is necessary if your poultry farm is large (in terms of the number of livestock) and you are breeding birds for commercial purposes.
For a chicken coop with an area of up to 10 m², a supply and exhaust system with two pipes is sufficient (one for the hood, the second for the air flow). If the pipes have not been insulated from the outside since summer, take care of this - a layer of mineral wool and roofing material will prevent the formation of condensate.
Before the onset of cold weather, check the areas of pipe joints and roofs for cracks and crevices, if necessary, seal up possible sources of drafts with resin.
If a mechanical system is installed in the chicken coop, it will not be superfluous to additionally check the wiring, since damp weather, often preceding the onset of frost, can cause short circuits in faulty wiring.If the number of your birds totals 10-15 chickens, you can get by with natural ventilation, but in winter such a system can cause additional troubles.
If you have a poultry farm of several dozen heads, and the poultry house area is 10 m² or more, you can not do without a supply and exhaust system (although it will not hurt in the case of a small population). In the case of breeding poultry for sale in the amount of several hundred (thousand) heads, provide forced ventilation in the chicken coops.

 Scheme of regulated natural ventilation

